The holidays always bring back so many sweet memories for me, and especially those simple, joyful traditions. There’s something so special about making treats that are not only delicious but also bring a little bit of festive cheer. That’s why these Salted Peanut Butter No Bake Christmas Trees have become a staple in my kitchen every December. They’re super easy, incredibly fun to decorate, and honestly, they taste like pure holiday magic!
Why You’ll Love These Salted Peanut Butter No Bake Christmas Trees
- They’re no-bake! No oven needed, which is perfect for busy holiday kitchens.
- The sweet and salty combo is absolutely irresistible. That peanut butter and pretzel crunch? Divine!
- So much fun to decorate! Grab the kids or your friends for a festive decorating party.
- They make a fantastic edible gift or a pretty addition to your holiday dessert spread.
Ingredients You’ll Need
- Light Brown Sugar: This gives our bars a lovely caramel-like sweetness and helps with that chewy texture. Don’t swap it for white sugar, it’s just not the same!
- Karo Light Corn Syrup: It’s crucial for binding everything together and giving that classic no-bake bar chewiness. I wouldn’t recommend substituting this.
- Creamy Peanut Butter: Use your favorite creamy peanut butter here. I prefer conventional brands for consistency in no-bake recipes, but you can experiment with natural if you know it works well for you.
- Crushed Pretzels: These add that amazing salty crunch! If you need a gluten-free option, just use gluten-free pretzels.
- Quick Oats: They absorb moisture and add a nice, hearty texture. Regular rolled oats work too, but quick oats blend in a bit more seamlessly.
- Crispy Rice Cereal: This is where a lot of that delightful crunch comes from. Don’t skip it!
- Semisweet Chocolate Chips: These melt down beautifully for our rich chocolate topping. Feel free to use vegan chocolate chips if you prefer.
- Powdered Sugar: Essential for our festive green icing. It dissolves smoothly for a perfect piping consistency.
- Milk: Just a little bit to thin out our icing. Use regular or your favorite plant-based milk.
- Green Gel Food Coloring: Gel coloring gives you a vibrant color without thinning out your icing too much.
How to Make Salted Peanut Butter No Bake Christmas Trees Step by Step
First things first, grab a really big bowl! You’ll want to combine your crushed pretzels, quick oats, and crispy rice cereal in there. Just set that aside for a moment.
Now, for the magic in a saucepan! Over medium heat, you’ll mix together your corn syrup and brown sugar. Keep stirring until it starts to bubble. Let it bubble for about 30 seconds – this is important for the texture – then take it right off the heat. Stir in your creamy peanut butter until it’s all smooth and lovely.
Pour that warm peanut butter mixture right into your bowl with the cereal mix. Stir it really well until everything is coated. Then, press it firmly into an 8×8 inch baking dish that you’ve greased and lined with parchment paper. Make sure the paper hangs over the edges; it’ll be your little helper for lifting later! Press it into all the corners, nice and even.
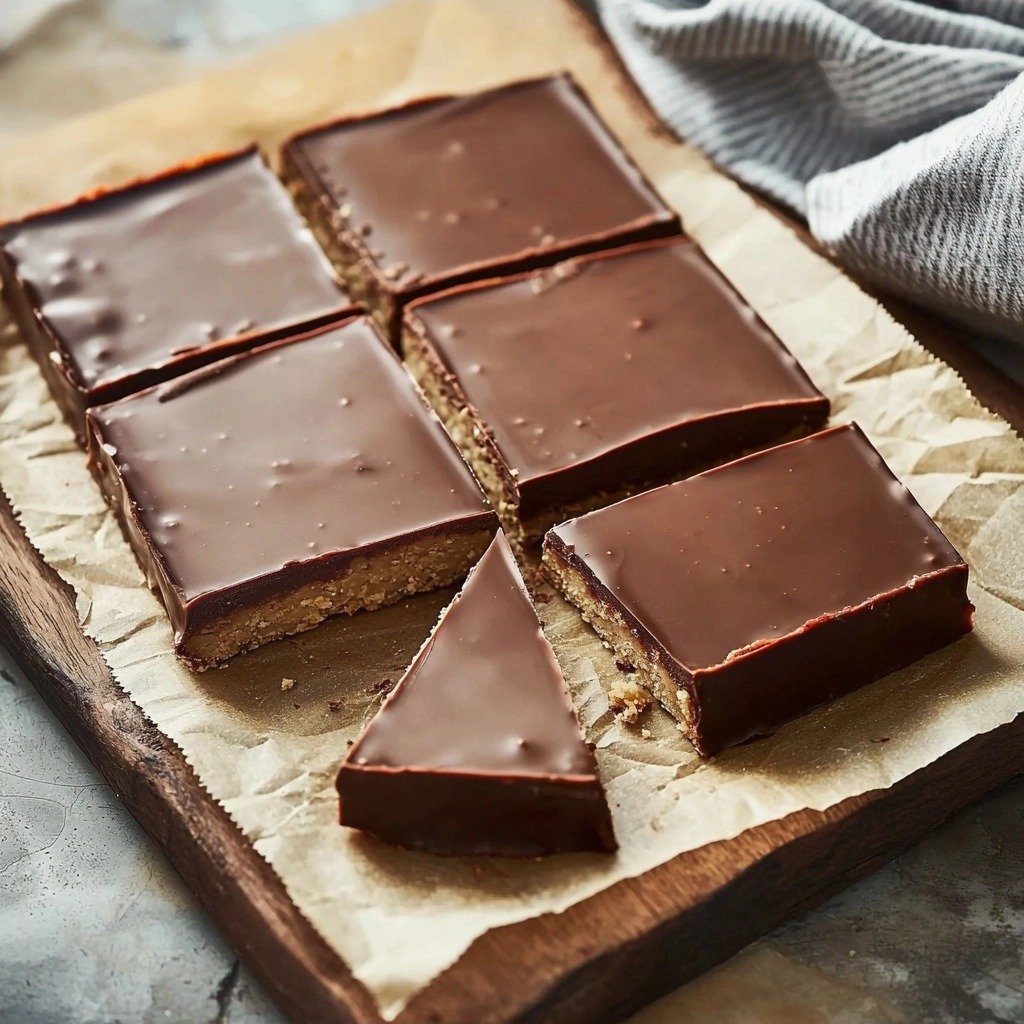
For the chocolate topping, get a heat-safe bowl and add your chocolate chips and peanut butter. Pop it in the microwave for 30 seconds, then stir. If it’s not smooth yet, microwave for another 15-30 seconds, stirring until it’s perfectly melted and glossy. Pour this over your peanut butter layer and spread it evenly. Give the pan a little shake and tap to help it settle. Then, into the fridge it goes for 30 minutes to an hour to set up. If you’re in a hurry, the freezer works too, but they’ll be a bit harder to cut.
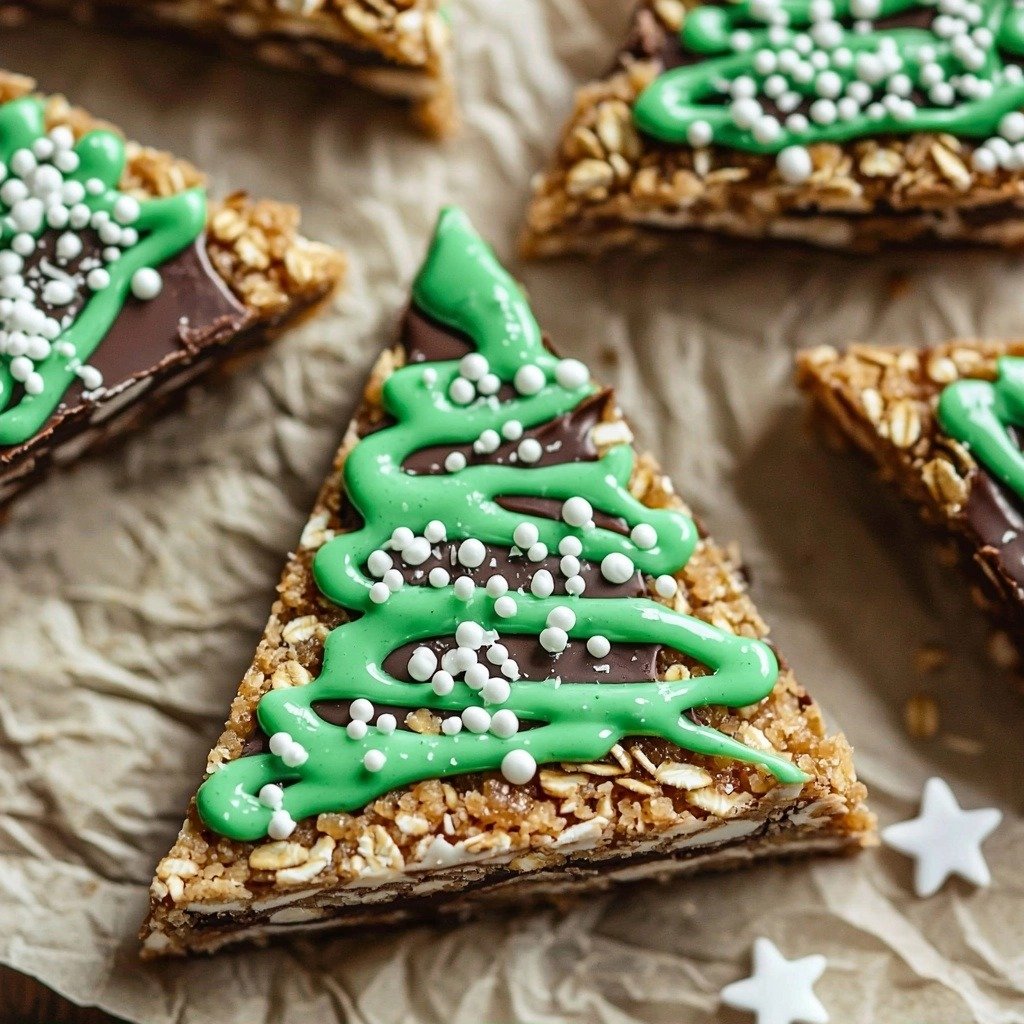
Once everything is nice and firm, lift the bars out of the pan using those parchment paper overhangs. You might need to run a knife along the two sides without paper first. Now for the fun part: cutting! Make one cut right down the middle, then slice each half into 5 triangles. For the icing, mix powdered sugar and milk until it’s like thick glue, then add your green food coloring. Use a piping bag or a ziplock with a snipped corner to pipe zig-zag lines, and don’t forget the sprinkles! Enjoy your beautiful Salted Peanut Butter No Bake Christmas Trees!
My Top Tips for Success
- I always make sure to really press the peanut butter mixture firmly into the pan. This helps the bars hold their shape beautifully.
- In my experience, using a good quality creamy peanut butter makes all the difference for flavor and texture.
- Don’t rush the setting time in the fridge. A well-chilled bar is so much easier to cut cleanly.
- Trust me on this one, lining your pan with parchment paper that overhangs is a lifesaver for easy removal.
- When decorating, if your icing is too thick, add milk 1 teaspoon at a time. Too thin, and it’ll just run off!
Common Mistakes to Avoid
- Not heating the corn syrup and sugar enough: This can result in crumbly bars that don’t hold together well. Make sure it bubbles for the full 30 seconds!
- Overheating the chocolate topping: Microwaving too long can cause the chocolate to seize or become grainy. Heat in short bursts and stir well.
- Not pressing the base firmly enough: If the base isn’t compacted, your bars might fall apart when you try to slice them.
- Trying to cut before fully set: This will lead to messy, uneven cuts. Patience is key for neat Christmas trees!
- Icing that’s too thin: If your icing is too runny, it won’t hold its shape when piped. Add milk very gradually.
How to Store Salted Peanut Butter No Bake Christmas Trees
- Countertop: Not recommended due to the chocolate topping and for best freshness.
- Refrigerator: Up to 5-7 days in an airtight container. Keep layers separated with parchment paper.
- Freezer: Up to 1 month in an airtight container. Thaw in the refrigerator before serving.
Frequently Asked Questions
Can I make these gluten-free?
Yes, absolutely! Just be sure to use gluten-free crushed pretzels and check that your crispy rice cereal is also certified gluten-free.
Can I use natural peanut butter?
I recommend using conventional creamy peanut butter for this recipe as natural peanut butter can sometimes separate and make the bars a different consistency. If you do use natural, make sure it’s well-stirred and smooth.
How can I make these vegan?
To make these vegan, use vegan semisweet chocolate chips, plant-based milk for the icing, and ensure your corn syrup and sprinkles are vegan-friendly.
What if my icing is too thick or too thin?
If your icing is too thick, add milk 1 teaspoon at a time until it reaches a pipeable consistency. If it’s too thin, you can add a tiny bit more powdered sugar to thicken it up.
Can I use different shapes?
Of course! While “trees” are festive, you can cut these into squares, rectangles, or even use small cookie cutters before the chocolate sets for other shapes.
I truly hope these Salted Peanut Butter No Bake Christmas Trees bring a little extra sparkle and joy to your holiday season! They’re such a fun and easy treat to make, and they always get rave reviews. If you whip up a batch, I’d absolutely love to hear how they turned out and see your festive creations!
PrintSalted Peanut Butter No Bake Christmas Trees
Festive and fun no-bake treats with a crunchy peanut butter base, rich chocolate topping, and whimsical green icing.
- Prep Time: 25
- Cook Time: 5
- Total Time: 90
- Yield: 10-12 trees
- Category: Dessert
- Method: No-Bake
- Cuisine: American
Ingredients
- 1/2 cup (100g) light brown sugar, packed
- 1/2 cup (170g) Karo Light Corn Syrup
- 3/4 cup (190g) creamy peanut butter
- 1/2 cup (60g) crushed pretzels
- 1 cup (100g) quick oats
- 2 cups (55g) crispy rice cereal
- 3/4 cup (130g) semisweet chocolate chips (reg or vegan)
- 1/2 cup (125g) creamy peanut butter
- 1 cup (120g) powdered sugar
- 1 1/2 tbsp milk (reg or plant-based)
- 1-2 drops green gel food coloring
- Sprinkles of choice
Instructions
- Combine the crushed pretzels, quick oats, and crispy rice cereal in a large bowl.
- Set the bowl aside.
- Mix together the corn syrup and brown sugar in a saucepan over medium heat.
- Continue to mix until the mixture starts to bubble.
- Allow it to bubble for about 30 seconds.
- Remove the saucepan from the heat.
- Add the 3/4 cup (190g) creamy peanut butter to the saucepan.
- Stir until the peanut butter is fully incorporated and smooth.
- Pour the warm peanut butter mixture into the bowl with the cereal mixture.
- Stir thoroughly to coat all the dry ingredients.
- Grease an 8×8 inch square baking dish.
- Line the dish with parchment paper, allowing the paper to hang over the edges.
- Press the peanut butter mixture firmly and evenly into the prepared baking dish.
- Ensure the mixture reaches all corners of the pan.
- Add the chocolate chips and 1/2 cup (125g) creamy peanut butter to a heat-safe bowl.
- Microwave for 30 seconds.
- Stir the mixture.
- Continue to microwave for another 15-30 seconds, stirring until smooth.
- Pour the melted chocolate topping over the peanut butter layer in the baking dish.
- Spread the chocolate topping evenly.
- Give the pan a gentle shake and tap to level out the topping.
- Place the pan into the refrigerator for 30 minutes to 1 hour to set.
- Alternatively, freeze for 20 to 30 minutes to speed up setting.
- Once set, remove the bars from the pan using the parchment paper overhangs.
- Run a knife along the two sides opposite the parchment paper if needed.
- Make one cut right down the middle of the large bar.
- Slice each half into 5 triangles to form Christmas tree shapes.
- To make the icing, mix together the powdered sugar and milk in a small bowl.
- Stir until the mixture resembles the texture and consistency of thick glue.
- Add 1-2 drops of green gel food coloring.
- Mix until the desired green color is achieved.
- If the icing is too thick, add 1 teaspoon of milk at a time until the correct consistency is reached.
- Transfer the icing to a piping bag fitted with a small round tip, or use a ziplock bag with a small corner snipped off.
- Pipe zig-zag lines onto each Christmas tree to resemble garland.
- Top with your choice of sprinkles.
- Serve and enjoy!
Notes
Ensure all ingredients are measured accurately for best results.
Press the peanut butter base very firmly into the pan for stability.
Allow ample time for the bars to set in the refrigerator for clean cuts.
For gluten-free, use certified gluten-free pretzels and crispy rice cereal.